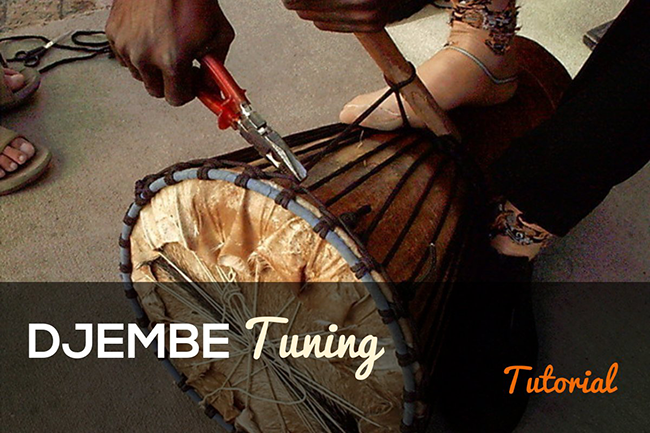
All you need to know about djembe tuning and tightening is shown in detail here.
If your drum sounds flat, dull or quiet, chances are the skin is not tight enough. Often, you don't even know your skin needs tightening until you hear a well-tuned drum.
Over time, your drum skin will stretch. It's natural, and not something you need to worry about. It just means that occasionally you need to do a little tightening.
A nice tight skin should create better tone when your hand hits the drum. It should also make more sound for less effort, which is better for your hands.
Note that tuning requires a bit of physical effort and can be hard on your back, so go cautiously.
If you're over that, let's get your drum sounding beautiful!
Use the links below to jump to a section or start below.
1. How much tuning does your drum need?
Let's work out how much tuning your drum needs by testing how tight the drum skin is.
Put your thumb in the middle of the drum face and push down firmly. Imagine you're pushing a thumb tack into a board.

How far can you push down? | What do I need to do? |
|---|---|
Not at all | No tuning is required, what are you even doing here? |
1cm / 0.4" or less | Minor tuning required |
More than 1cm / 0.4" | Major tuning required |
More on major and minor tuning in a moment, but for now let's take a look at tools.
2. Tools for djembe tuning
For minor tuning, all you need is a Short stick - about 16" (40 cm) long and an inch wide. A section of broomstick is ideal.

For major tuning, you will need 2 things:
- A pair of pliers
- A device to grip the rope and pull it. There are 3 ways you can do this:
i. Short stick
Like the one above. It works, but it's n ot as efficient as the two items below.
ii. A clam cleat puller
This small device is for gripping the rope and allowing you to pull on it without giving you blisters on your hands! Well worth it.
Here's the one I recommend:
iii. Rope puller toolset
This device will give you great leverage for pulling the ropes to tighten the drum. It replaces the short stick and clamcleat above and your back will thank you. If you're going to be tightening more than one drum in your life, it's a great investment.
Here's the one we recommend.
3. Has the Mali weave been started on your drum?
The Mali weave is a series of knots around the drum horizontally. The weave starts at the bottom and works its way horizontally around the drum. It threads in between the vertical ropes and pulls them together, pulling the drum head down, which tightens the skin.

Photo Michi Henning
Ideally, the weave should not go more than halfway up the drum. This is because the skin is more likely to break when making knots nearer the top.
The weave starts at the bottom, coming out of one of the loops in the bottom ring and going left or right. To tighten the drum you will need to start, or continue making these knots.
Therefore you will need enough space on the drum to make these knots without going over half the height.
Look at the examples below and compare your drum.
No weaveThe rope runs vertically, as shown by the red arrows. The horizontal weave has not been started. This is also what your drum will look like if you have just finished putting a new skin on.  |
One row of weaveThe weave has been started on this drum, as shown by the red arrows. There are about 10 knots and you can see the vertical ropes are now crossed.  |
3 rows of weaveThe Mali weave circles three times around the drum, as shown by the red arrows. They are tightly stacked and cover the bottom third of the drum.  |
1 row of weave, but the height is above halfwayYou can see on this drum that although there is only one row of weave, it is high up on the drum and there is no more space to make another row. In this case, you should undo the weave and take up the slack on the verticals.  |
4. Getting Started
If your drum has no Mali weave, like the first drum in the table above, go to 7. The Mali Weave
If your drum has Mali weave, work out how many horizontal rows you could add before you reach halfway up the drum.
Now use the table below to see what steps are required:
Your drum needs minor tuning AND you have space for at least 1 more horizontal row | REQUIRED: |
Your drum needs minor tuning, but you do not have space for one more horizontal row | REQUIRED: |
Your drum needs major tuning AND you have space for at least 3 more horizontal rows | REQUIRED: |
Your drum needs major tuning, but you do not have space for at least 3 more horizontal rows | REQUIRED: |
5. Undoing the Mali Weave
Start by finding the end of the rope making the horizontal weave (sometimes wound around the drum's waist, sometimes made into a strap of sorts or sometimes it simply runs out during the weave). Follow it back to the drum, untie any knot holding it in place and work the first weave loose. You may need to 'snap' the knot back to undo it.
Continue, knot by knot, working your way around the drum, until you have undone all of them and have reached the knot at the verticals. Don't undo this knot.

6. Tightening the verticals
6.1. Find This Knot
Find where the rope starts. Don't untie it yet.

6.2. Pull to tighten
Thread a short thick stick under the rope A (marked in blue), grab both sides of the stick with both hands and pull towards you. Once you have pulled it up to tighten it, clamp the rope at B with the pliers. You may need to wind the rope around the stick to take up any slack. When you've pulled it quite tight, clamp the rope right at the top (at B) with pliers.


Note: If you're just tuning your drum and not reskinning it too, your drum skin will not have the string and skin on the face, like the photos above.
6.3. Keep the pliers tight
Step 1. Hold the pliers in place, clamping the rope at A. Don't let go.

Step 2. Take the stick out and wedge it under the next downward vertical (B) and pull hard.
While still pulling, release the pliers and now clamp at the top of the blue rope at C.
Repeat all the way around the drum.
6.4 Keep going
When you get right round the drum, you'll reach the knot again.
A. Keep the pliers tight.
B. Loosen the knot that is tied to the loop in the other end. Don't untie it completely.

Take up all the slack in the rope and tighten the knot.
You're done tightening the verticals! Your djembe should already sound better.

7. The Mali Weave
The Mali weave is usually made using the same piece of rope that is used to make the verticals. You can however use another separate piece if needed.
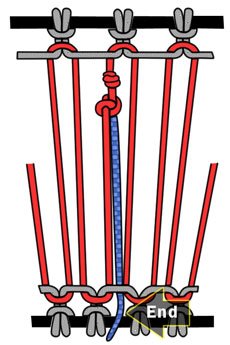
Step 1: Find the loose end of the long piece of rope. Don't untie it, but thread it through the loop directly below the knot as shown.

Step 2: Thread the rope as shown.

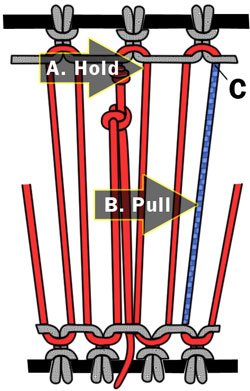
Step 3: Push/flatten the rope down towards the bottom loops and pull on the loose end.

The knot should slip into place like this.

Now repeat the process from step 2 on the next verticals, slowly working the weave around the drum.
Read the FAQ below for more on how far to go.
8. FAQ
How many knots should I make?
This depends on how much the drum needed to be tightened in the first place. For minor tuning, only do between 1 and about 10 knots. For major tuning you may need to thread the weave around the entire drum 3 or 4 times. Each time you get back to the beginning you're going to have to use a little common sense to navigate around the vertical with the knot in it.
If the drum's still not tight after 3 rows of the Mali weave, there isn't much room for more and you may have to undo the weave and start again.
Don't tighten too much the first time, especially if it's the first time the drum has been tuned. Then every couple of weeks work in a few more knots, until after about two months when the skin should be quite hard.
For the authentic Guinean lead sound the skin has to be tightened past the point where it rings and the tension chokes the harmonics to give a loud but dry timbre.
If you tighten too much, you'll break the skin and you'll have to reskin it, so go carefully.
The moment you start thinking, 'I'll just do one more knot', it's time to stop.
What if I break the skin?
If, despite all your gallant efforts, it's gone belly up and the skin has torn, then you're in for a big job I'm afraid.
Go to reskinning a djembe.
What if I run out of rope?
You'll need to tie another piece on and continue. This can get tricky doing the Mali weave with a knot in the rope , but it can be done.
What if I break the rope?
If you break the horizontal (weave) part of the rope, you may be able to unweave a little bit and tie another piece on. It can be tricky working with a knot, but it's better than the alternative...
If you break a vertical or a loop (the rope on the metal rings), this means you're unfortunately going to have to restring the drum. Go to reskinning a djembe and start from Step 7.
If you've been careful, and it's nice and tight, you're done!
Congratulations!
You're hopefully the proud owner of a great sounding drum.
Now I have a little job for you...


just wanted to let you know – I followed these instructions along with the tuning and the results came out great! thank you for the informative and detailed instruction.
Hey Adam, thanks very much. Glad it helped.