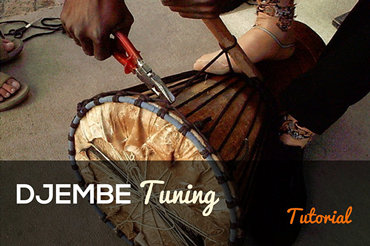
This is the instruction on how to use our djembe puller table, which you can buy here.
Watch the video below:

Instructions for Using the Djembe Puller Table
1. Place the puller table (tensioning device) on a flat surface or workbench with the crank handle facing you.
2. Insert the stabilizer rods (the two sticks) into the top of the table.
3. Place the drum behind the stabilizer rods with the crank handle facing you.
4. Connect the cleat to the carabiner.
5. The puller table uses a pulley and cleat system:
- The cleat hooks onto the rope.
- The pulley is connected to another rope, which is attached to the crankshaft.
- When you turn the crank handle, it pulls the pulley down, which pulls the cleat down and tightens the rope.

6. Release the cleat and move on to the next rope that needs tensioning.
7. Use pliers to lock the tension into the rope.
8. Start on vertical number one (the vertical immediately behind your main djembe knot):
- Connect the cleat onto the rope at vertical number one, near the top.
- Steady the drum against the two stabilizer rods to prevent it from falling forward.
- Turn the crank handle to pull the cleat down.
- Use pliers to clamp onto the rope you’re pulling, right at the top near where the rope goes into the rope loops.
- Release the crank handle and the tension.
- Grab the orange rope on the cleat and pull up to release the cleat.
- Pull off the cleat.
9. You’ll have some slack on your rope. Feed that slack through vertical number two, pull up on vertical two to pull the slack through, and pull down on vertical three gently.
10. Take the cleat again and connect it to vertical number three.
- Turn the crank handle and pull the cleat down to tighten vertical number three.
- Watch the height of the drum head as you tighten to get it to the height you want.
- Release your pliers on vertical one and clamp them onto the top of vertical number three.
- Release the crank handle and pull off the cleat using the orange rope.
11. Continue this process, moving along each vertical.
12. At some point, switch to the next djembe cleat, the T-bar cleat. The T-bar is used to pull the rope without causing any damage, unlike the regular cleat which can sometimes do a little damage.
13. To switch to the T-bar cleat:
- Undo the screw on the carabiner and release the cleat from the carabiner.
- Put the T-bar cleat onto the carabiner and tighten it up again.
- You need a fair bit of slack to use the T-bar cleat.
- Lay the T-bar cleat on top of the rope as shown in the video.
- Take the loose end of the rope and turn it clockwise to make a loop.
- Place that loop onto the top of the T-bar cleat as shown.
- Turn the crank handle. The knot will tighten onto itself, creating a secure connection with no damage to the rope.
14. Release your pliers from the previous rope and clamp them onto the top of the rope you’ve pulled with the cleat.
15. Release the crank handle, undo the knot on the T-bar, and pull through the slack in the rope. Move the drum if needed.
16. Continue this process as needed.

